Crescent Moon
Artwork ©Sandi Baker
In order to use the image in this tutorial you MUST purchase it from CILM
For more examples scroll down
I used a mask from Becky, her site is down, added to the supplies (Becky023)
The sand tube can be found at Corel, download the Beach file here
Filters:
Filters Unlimited /Paper Textures (optional , can be made with textures of your PSP)
Muras Meister / Clouds
Xero / Porcelain (optional)
VM Natural / Raygun
DSB Flux / Bright Noise
The tutorial was made with PSP X and Jasc Animation Shop
____________________________
1.) Open a new raster layer 600x250 pixels and floodfill with #c89e75
2.) Effects / Filters Unlimited / Paper Textures/ Canvas Fine / Intensity 90
(if you don`t have this filter, add a texture of your choice)
3.) Duplicate this layer /on this new layer go to Effects / Muras Meister / Clouds
4.) Set the blend mode to BURN
5.) Add a new raster layer / Picture Tube Tool and fill with sand, look at my example below
6.) Set the blend mode to SOFT LIGHT and lower the opacity to 65%
7.) Copy and paste your tube as new raster layer / duplicate 2 time and arrange the tubes like I did on my example below
8.) Merge down your 3 tube layers
9.) Layers / load mask from disc / Becky mask 23 (fit to layer) / merge group
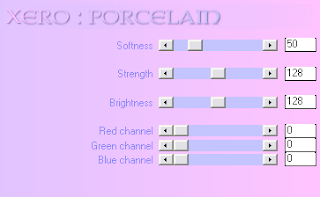
10.) Effects / Xero / Porcelain
11.) Copy and paste my moon tube as new raster layer and place it at the top right corner / set the blend mode to SCREEN
12.) Merge all visible and duplicate / Effects / VM Natural / Raygun
13.) Lower the opacity to 80% and merge visible
14.) Pen Tool / Line width 2 pixels / #e6ba6a
15.) Draw 3 lines like in my example below / convert to raster layers
16.) Merge these lines / Effects / Distortions Effects / Wave
17.) Duplicate your lines / Free Rotate this layer to 90% left and place it on the left side
18.) Merge your 2 line layers / Effects / 3D Effects / Drop Shadow / 2 / 2 / 45 / 7 and set the blend mode to OVERLAY
19.) Copy and paste your tube again , for placement look at my example / add porcelain effect and drop shadow (same settings as before)
20.) Adjust / Sharpness / Unsharp Mask
21.) Selection / select all / modify / contract by 9 pixels / selection / invert
22.) Add a new raster layer / set your foreground to pattern and fill the layer
23.) Drop Shadow 1/1/45/5 and repeat with -1/-1/45/5 / deselect
24.) Add the artist copyright and your license
25.) Text Tool / size 80 / Champagne & Limousines/ foreground none / background #e6ba6a and type your name / free rotate 90 % left and convert to raster layer , for placement look at my example
26.) Add Drop Shadow 2/2/45/7
______________________________________
Animation
1.) Highlight your "waved line" layer / Effects / DSB Flux / Bright Noise
2.) Apply the same effect on your name / Edit / Copy Merged and paste as new animation in your Jasc Animation Shop (AS)
3.) Back to your PSP / Undo your DSB Flux steps
4.) Highlight again your "waved line" layer /Effects / DSB Flux / Bright Noise and click once at MIX
5.) Again apply the same effect to your name / Edit / Copy Merged and paste after current frame in AS
6.) Repeat step 3-5 once more
7.) In your AS / View / Animation and save as .....gif
~~~~DONE~~~~
This tutorial was written 30th of june 2009 and the copyright is mine


No comments:
Post a Comment