Nightmare
Artwork ©Nocturne
In order to use her art you must purchase a license and her tubes at PicsForDesign.com
This is a CT tutorial for
The tube I used is an "Exclusive" Tube, more information you will find here:
_____________________________________
I used a Scrapkit of Bella Caribeña called Animals Witch
___________________________________
My Supplies: HERE
Font : Phantom Fingers
Filters: Eye Candy / Drop Shadow
The example was made with PSP X
_____________________________________________
I am not going to explane how to copy and paste, be creative or look at my tag for placement 😉
1.) Open a new raster layer 900x900 and fill with white
2.) Copy and paste Z-BC-AnimalsWitch-PP (6) as new raster layer
3.) Apply the mask provided / duplicate this layer 2 times and merge those
4.) Copy and paste the dark tree as new raster layer / move it to the right upper side
5.) Copy and paste NightmareHexagram as new raster layer / move to the left upper side and set opacity to 70%
6.) Copy and paste NightmarePurpleFrame as new raster layer
---------------------------
Open your tube / hide the unwanted layers / highlight the one you want to use / edit / copy merged and paste as new image
I recolored the pumpkin / zoom in to 200% / Freehand Selection Tool
Adjust / Hue and Saturation /Colorize
Adjust / Brightness and Contrast
Select none / resize your tube
---------------------------------
8.) Duplicate your tube and move one below your frame layer
9.) Highlight your top tube layer / Eraser Tool
10.) Effects / Topaz Labs / Topaz Clean 3/ CrispStyle
11.) The stones in the tag I took from another kit (free one) of Bella Caribeña called Pumpkin Farm
12.) Effects / Photo Effects / Black and White Film
------------------------------------
Let's create the bottle with caged animals
Open BC-AnimalsWitch-Elem (16)
You will need those elements
Resize and place them the way that they fit in the bottle (look my tag)
Add a drop shadow and merge those elements
Freehand Selection Tool / same settings as before
Promote Selection to layer / on the original layer hit "delete" on your keyboard / unselect
On the new layer set opacity to 50% and merge those 3 layers
Effects / Topaz Labs / Topaz Clean 3 / same settings you used before
------------------------
For the next one, we need..
Place the rabbits on top of the bowl (for placement look at my tag) / drop shadow
Freehand Selection Tool again
Hit " delete" on your keyboard / select none
On top of the rabbits I put the pink dust
Effects / Topaz Labs / Topaz Clean 3
----------------------------------------
13.) Add elements to your liking and apply Effects / Topaz Labs / Topaz Clean 3 to them
14.) Add drop shadow
15.) Type your text and/or name in the color you wish / stroke width 1 black
16.) Convert to raster layer / duplicate / on the top layer a drop shadow
17.) On the bottom layer / Effects / Distortion Effects / wind
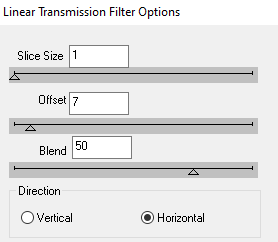
18.) Effects / DSB Flux/ Linear Transmission
19.) Effects / Edge Effects / Enhance / opacity to 65%
20.) Add the artist copyright and your licence / delete the white background layer and save as png
~~~~DONE~~~~


Thank you! It's a great lesson !!!
ReplyDelete