
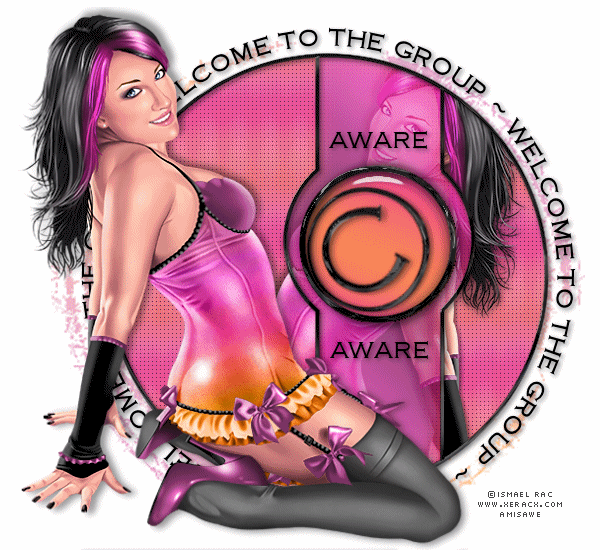
Spinning Around

Artwork ©Verymany
In order to use this art you must purchase a license and tubes at their site
Font : Copperplate Gothic Light
Supplies: Templates and pattern made by me here
Filters:
Ulead Effects Gif-X 2.0 Plugin
Alien Skin / Eye Candy 5 / Impact / Chrome and Glass
_____________________________________________
Let`s make the ball first
1.) Open a new raster layer 150x150 and fill with a gradient that fit the color of your tube.
2.) Text Tool / Copperplate Gothic Light / size 100 / black and type the copyright symbol
3.) Now stretch it a bit , like I did in the screenshot (it should be a round circle)/ Objects / align/ center in canvas

4.) Convert to raster layer / Eye Candy 5 / Chrome / Black Latex


5.) Add Drop shadow / 2 / 2/ 45 / 7 and merge visible
6.) Effects / Ulead Effects / 3 D Map

7.) Click on save

8.) Save it somewhere where you can find it later
9.) Now click on Cancel and Ulead Effects close
____________________________________
Let`s make the tag now
1.) Open a new canvas 600x500 and floodfill with white
2 .) Add a new raster layer and fill with your gradient /apply mask of choice / merge group
3.) Copy and paste my template (SpinningAroundTemplate_GF ) as new raster layer
4.) Copy and paste my SpinningAroundPattern and move it below the template /colorize to your liking
5.) Magic Wand Tool / highlight the template layer

6.) Selection/ modify / expand by 2 pixels / add a new raster layer / move this layer below the template and fill with your gradient (inverted)
7.) Keep selected / Adjust / Blur / Gaussian Blur 13 / deselect
8.) Highlight your pattern layer / copy and paste your tube as new layer
9.) Magic Wand Tool / make the same selection as before in the screenshot / right click in the layer palette (tube layer) and promote selection to layer and move that layer above the blurred gradient layer

10.) Deselect and set the blend mode to soft light
11.) Highlight your template layer / Magic Wand Tool

12.) Selections / modify by 2 pixels / selection invert / highlight your tube layer and hit the delete button on your keyboard / deselect
13.) Copy and paste your tube / for placement look at my example / add a drop shadow
14.) Highlight your template layer and add a drop shadow too
15.) Open your animation shop and open the spinning ball animation /delete the first frame
16.) Click on a frame (doesn`t matter which) / right click and copy / paste this frame to your psp as new raster layer

17.) Ellipse Tool / foreground black / background none

18.) Draw a circle around your spinning ball

19.) Convert to raster layer / effects / Eye Candy 5 / Impact / Chrome / Black Latex


20.) Magic Wand Tool / click inside this circle / modify / expand by 2 pixels / add a new raster layer and move it below the circle layer
21.) Effects / Eye Candy5 / Glass / Clear / deselect / merge the circle layer with the glass layer
22.) Text Tool / type "AWARE" for placement look at my tag / add dropshadow
23.) Add your name or text to the tag or around the template
24.) Add the artist copyright and your license !
25.) Hide the glass layer and merge visible

_______________________________________
Animation:
1.) Copy and paste your tag as new animation to AS
2.) Hold down Ctrl and hit "L" on your keyboard till you have 24 frames
3.) Highlight your ball animation / Edit / Select all / Edit / Copy
4.) Highlight your tag / Edit / Select all / Edit / Paste into selected frame
5.) Go back to your PSP / copy and paste the glass layer as new animation into AS
6.) Repeat step 2
7.) Edit / Select all / edit / Copy
8.) Highlight your tag / Edit / paste into selected frame
12.) In your AS / View / Animation and save as .....gif
~~~~DONE~~~~
This tutorial was written 22th of august 2009 and the copyright is mine


Woooowwwwwwwwwwww
ReplyDeleteVery cool-thank you for sharing your talent :)
ReplyDelete